Showing posts with label recipes. Show all posts

Friday, March 11, 2011

Bacon Linguine Fiesta Recipe

We used our home-cured bacon in a recipe for the first time tonight, and it was amazing!  We used the bacon from batch #1, which turned out a bit too strongly flavored to be eaten on its own, but what a fantastic addition to a pasta dish!  Just that small amount of bacon added flavor to the whole dish. 

This is NOTHING like store bought bacon.  The difference is unbelievable.

Here's the recipe we made up.  We're calling it "Bacon Linguine Fiesta."  It makes a big batch, so there's plenty for company or for leftovers.


1 lb. home cured bacon (from batch #1), diced
1 green bell pepper
1 red bell pepper
1 yellow bell pepper
1 purple onion
1 white onion
7 medium tomatoes
12 oz. sliced mushrooms
1 lb. linguine
Shredded cheese to garnish

Cook the linguine according to the directions on the package.

In a large frying pan, cook the bacon gently at a low temperature, stirring constantly until it begins to release some of its fat into the pan. 

Add the mushrooms to the bacon and continue to cook, stirring frequently, until the mushrooms are done.

Remove the bacon and mushrooms from the pan, allowing any excess pan drippings to drain back into the pan.  Add the bacon and mushrooms to the cooked, drained pasta and toss thoroughly to mingle the flavors.

In the remaining bacon fat in the pan, cook the remaining vegetables.

Serve the pasta on plates, topped with a generous helping of veggies.

Garnish with a sprinkle of shredded cheese.

Tuesday, March 8, 2011

Rendering Lard

As I noted in my previous post, the overweight hog we sent to the butcher recently produced---in addition to a freezer full of pork---more than 75 lbs. of fat, which I have been rendering into lard.

The first question people ask when I tell them I've been rendering lard all week, is:  "Why?  No health-conscious person cooks with lard anymore, do they?"  In fact, that's not the case at all.  As described in these various articles, lard is a lot healthier than most people think:

Lard:  The New Health Food
Lard Has Clearly Won the Health Debate
Praise the Lard
Lard:  After Decades of Trying, Its Moment Is Finally Here
Trans Fatty Acids:  Why Lard May Be Better for You Than Vegetable Oil

Of course, even with the unexpected benefits, I'm not planning to eat 75 lbs. of lard this year!  Some of it I'll save for cooking, but the majority I'll make into soap.

Lard soap is mild and gentle to the skin, and it will be great to have some "zero mile" fat for soap making (as opposed to the olive oil I use to make my sheep's milk soap, which is imported from thousands of miles away).  I'll still keep making the olive oil based soap, since it's been very popular, but the natural farmstead lard soap will give buyers an additional option.  Choice is good!

Anyway, since a lot of people have never rendered lard before, I figured I'd show the process, step by step, here on the blog.  Rendering isn't difficult, but it does take a while, so you have to be patient.

Since I had such a huge amount of lard to render, I had to do it one portion at a time over several days, according to how much would fit into my largest stock pot.

Our hog was very large and very obese, so he produced 22.5 lbs. of leaf lard and 53 lbs. of back fat lard.  The leaf lard is the internal fat from around the pig's kidneys.  It is considered the highest quality lard, since it's said to have a finer texture and a more neutral flavor than the back fat lard.

Here is one of the slabs of leaf lard from our pig.  We got two slabs this size.


The slabs of back fat were even larger.  Folded over themselves and stacked together, they filled an entire banana box!

The first step was to cut off chunks of fat that were a more convenient size to handle.  Here's a chunk of back fat, ready for me to start processing.


To get a neutral (not so porky) flavor to my lard, I trimmed off all the little scraps of meat.  Then I cut the fat into little chunks, maybe about 1" square.

The discarded scraps of fatty meat made a VERY popular snack for my chickens!


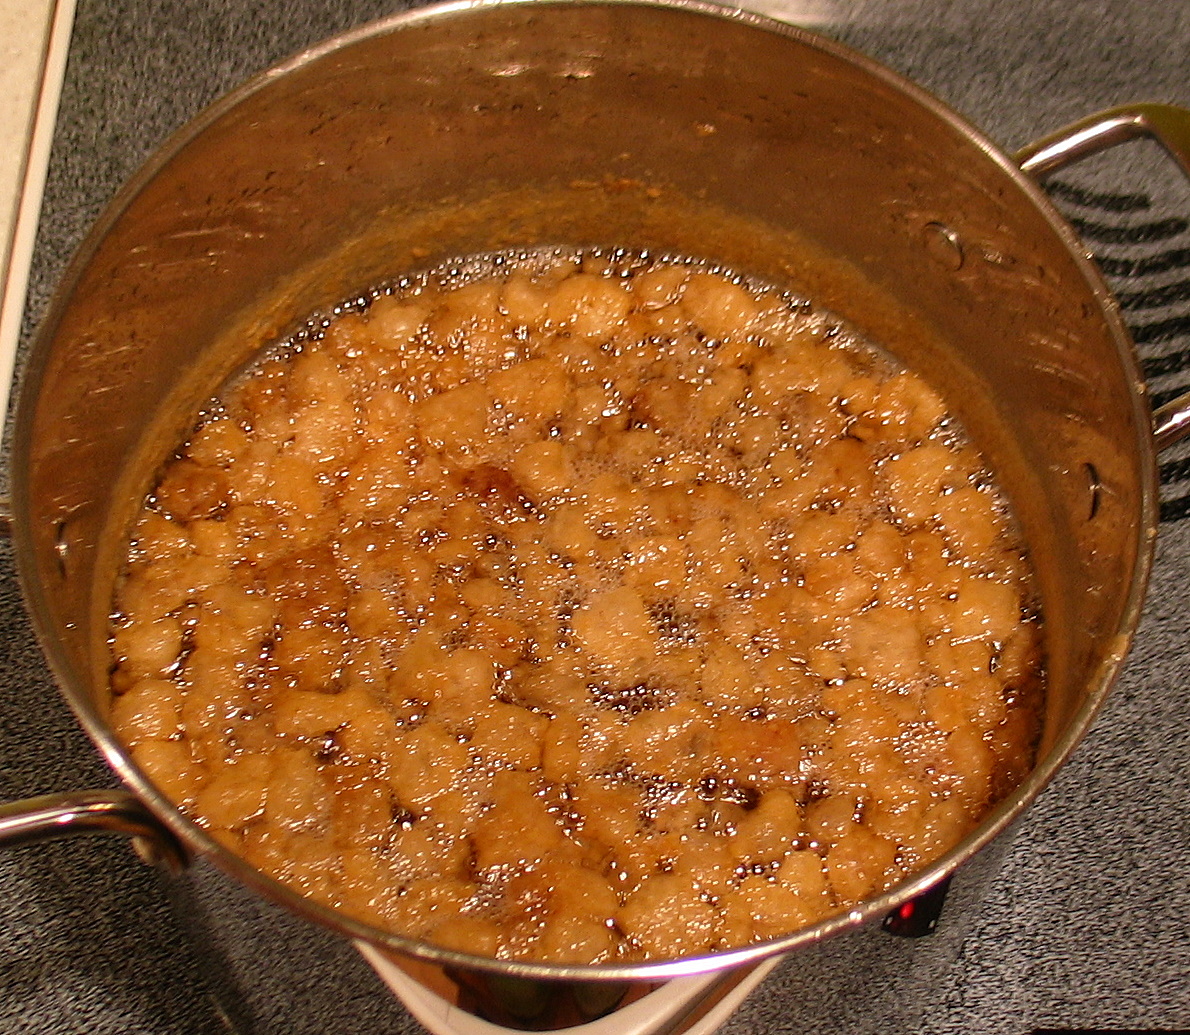
To begin the rendering process, I put a couple of inches of water in the bottom of my largest stock pot, then filled the rest of the pot with cut-up chunks of fat.  I heated the pot on the stove top until it started to boil, then reduced the heat to a low simmer.  

The water in the bottom of the pot helps prevent the fat from sticking before it has a chance to melt.  By the time the rendering is finished, all the water will have evaporated away.  

You do need to stir the pot (less in the beginning and more frequently toward the end), to prevent the solids from sticking to the bottom and burning on.  


Almost immediately after the boiling started, the fat changed color and began to get translucent.


Little by little, the chunks of fat started to release quantities of melted liquid lard.


For a while, the liquid in the pot was a milky whitish color.  It was at this point that the pot began to need more frequent stirring, because the solids started sinking to the bottom.


Eventually, the liquid turned clear.


The smaller solids sank to the bottom.  It was hard to keep them from sticking to the bottom of the pot!  Meanwhile, the larger solids puffed up and floated on the top of the liquid.


When the floating bits turn golden brown and slightly crispy, the rendering process is done.  For a pot this size, it took about 6 hours.


Next, I strained the rendered lard through a strainer lined with several layers of cheesecloth.  The solids that are left in the strainer are "cracklings."  You can salt them and eat them as a snack, cook them in cornbread, sprinkle them on salads, or use them anywhere else you might use bacon bits (they don't taste like bacon, though.  They taste---not surprisingly---like pork rinds).

The cracklings from the backfat came out chunky, as shown in the picture above.  The cracklings from the leaf lard came out in smaller crumbs.


I'm storing my cracklings in ziploc bags in the freezer until I'm ready to use them.  

The rendered, filtered lard itself I poured into mason jars.  I had originally thought I would pour the lard into molds and store it in blocks like pounds of butter.  But unlike the partially hydrogenated lard you can buy in blocks from the grocery store, this lard is still liquid at room temperature, so jars turned out to be essential!

When the lard was first poured into the jars, it was a clear, pale, golden color.


By morning, it had cooled down and turned pure white, but it was still liquid.  It does turn into a solid if you put it in the refrigerator or freezer.
I'm going to store my lard in the freezer until I need it.  Frozen, it should keep almost indefinitely.

From the 75 lbs. of fat I got from my pig, I rendered about 37 quarts of lard.  That will make an awful lot of pie crusts and and awful lot of bars of soap!

Sunday, February 13, 2011

Sinfully Delicious: How to Make Eccles Cakes

Every year, around my birthday, Ken makes my favorite treat:  Eccles cakes, a pastry so irresistibly delicious, they were once illegal.

"Eccles Cakes are a Lancashire specialty, named after the town of the same name.  They were very popular in the seventeenth century until they were banned (along with mince pies) in 1650 by the Puritans, who thought they were sinfully rich.  Oliver Cromwell went so far as to pass an act of Parliament authorizing imprisonment of any person found guilty of eating a currant pie."  Great British Cooking:  A Well Kept Secret, by Jane Garmey
I visited England for the first time back in the mid-1980s, and it was there I tasted Eccles cakes for the first time.  I liked them so much, I sought out and bought a British cookbook, just so that I could have the recipe.  I wasn't much of a cook in my younger days, so life went on and the recipe went untried for years, but I never forgot how delicious they were.  Eventually, 20 years later, I convinced my husband to make a batch for me as a treat.  

Could the reality of these simple little pastries stand up to 20 years of imagining?  After remembering them fondly for so many years, would I be disappointed when I got to taste one again?

No indeed!  The first bite of an Eccles cake, warm from the oven is always even more meltingly, overpoweringly delicious than I remember from the last time I had them.

So I decided to post directions on how to make them here on my blog.  Everyone should be entitled to taste Eccles cakes as often as they like!

Eccles Cakes Recipe
(makes about 3 dozen)

Ingredients:
  • 1 package of ready-to-bake frozen puff pastry sheets (17.3 oz, 2 sheets per box)
  • 1 box of dried currants (10 oz.)
  • 1/2 cup brown sugar
  • 1/4 cup butter
 

  • 1 1/2 tsp allspice
  • 1 tsp nutmeg
  • Milk (approx 1/2 cup)
  • Granulated sugar (approx. 1/4 cup)

Directions:

1.  Remove the puff pastries from the package and lay them out flat to thaw.

2.  Preheat the oven to 400 degrees (F).

3.  Combine the currants, brown sugar, butter, allspice, and nutmeg in a small saucepan.


4.  Heat gently, stirring occasionally until the butter is melted and the ingredients are well mixed.  Remove from heat.


4.  On a smooth floured surface, roll out the puff pastry dough with a floured rolling pin until it is about 12" x 16".


5.  Cut the rolled pastry dough into 4-inch rounds.  We use a small custard ramekin as a guide.  When you have cut all the circles you can, collect the remaining scraps of dough, knead them back together, then roll them out again and cut the rest of your circles.


6.  Place one spoonful of the currant mix into the center of each pastry round.  Brush the edges of the pastry with a little milk to moisten.


7.  Fold the edges of the pastry up around the currant mixture and press into place.


8.  Turn the little bundle over to hide the seam.  Arrange the cakes on a cookie sheet lined with baking parchment.  Cut 2-3small slits in the top of each pasty to make a place for the steam to escape.  Brush the tops with milk and sprinkle with granulated sugar.


9.  Bake for 15 minutes or until golden brown.  Serve warm.

    Wednesday, July 9, 2008

    How to Make Cherry Cordial (Part 3)

    So, this weekend when my friends were here, we tasted the Cherry Cordial I made recently. Since I posted the recipe here on the blog, I thought I'd post the results here too, since my recipes are always a work in progress, and subject to revision.

    Having sampled the results, my opinion is that the cordial was delicious, but definitely NOT cherry flavored. The couple of cinnamon sticks FAR outweighed the fresh cherries, so this turned out to be a sweet, luscious cinnamon cordial with a mild cherry background to keep the cinnamon flavor from getting too prominent and bitter.

    Would I make this recipe again? Yes, definitely. But I might not bother to use my precious hand-picked, straight-off-the-tree cherries to do it. Since you can't taste them much anyway, frozen cherries would have been easier.

    With this, my third attempt at making a cherry cordial, and my third failure to get anything that truly captured the wonderful flavor of fresh cherries, I'm going to have to conclude that cherries, like strawberries, just don't translate into cordial making in a way that maintains their full flavor. Like strawberries, the cherries seem to get weaker, milder, and a tad insipid... tasting a bit like fruit punch.

    But, as this cinnamon cordial demonstrates, they can still be lovely bases to help highlight other ingredients.

    Monday, June 30, 2008

    How to Make Cherry Cordial (Part 2)

    As promised, it's the end of June, and here's Part 2 of my "How to Make Cherry Cordial" post.

    As you may remember, the cherries and cinnamon sticks have been steeping in the brandy for about a month now. Yesterday, I opened the jars and strained the liquid. As you can see, the brandy leached not only most of the flavor, but also most of the color out of the cherries.


    Next, I put a paper coffee filter (wetted with water, for ease of handling and to help speed the initial filtering) into a large funnel, and began filtering the cordials. This is the most tedious part of the cordial making process, because some cordials take a VERY long time to filter. But this one wasn't too bad.

    While I was filtering, Ken made the sugar syrup. To do this, you heat 2 cups of sugar and 1 cup of water in a saucepan, stirring constantly until it just starts to boil and the liquid suddenly goes clear. Then remove the pan from the heat. This makes 2 cups of syrup.

    When the cordial is done filtering and the sugar syrup is cool, you just add the syrup to the cordial, tasting frequently, until it is as sweet as you like it.

    In this case, Ken and I felt that the cinnamon flavor was too strong and the cherry flavor was too weak, but we noticed that the cherry flavor became more prominent the more syrup we added. So we made a sweeter cordial than we normally do, by adding the entire 2 cups of sugar syrup.

    The result was 2 mason jars almost full of cherry cordial, which will need to steep for about a week to reach full flavor.

    Normally I bottle my cordials in pretty, tall, long-necked bottles, but this time around, I made this batch knowing that we're having a bunch of friends over for the July 4th weekend, and we'll probably drink most of the cordial then, so I didn't bother with the fancy bottles, I just put the cordial back into the mason jars to wait until our friends arrive:

    Tuesday, May 27, 2008

    How to Make Cherry Cordial (Part 1)

    The bird netting we put up on our cherry tree last week really shouldn't have done much good, because when we hung it, we could only reach the very lowest branches, leaving the majority of the tree exposed. But apparently the very presence of bird netting so offended the local crows and cardinals, that they promptly abandoned our tree and have left it untouched, despite the thousands of ripe cherries it now boasts.

    There is something about a loaded fruit tree---especially if it's one that you didn't have to plant, prune, water, or spray with pesticide---that makes you feel rich, gifted with the treasure of free food in abundance, there for the taking. There's something profoundly joyful about accepting Nature's bounty, as if the earth herself has chosen that moment to try to make you feel welcome on the planet.

    With such an abundance of cherries this year, it took me almost no time at all to pick enough to make a couple of jars of cordial. I don't know what variety these cherries are, but they are clearly the smaller, tarter pie cherries, not the big sweet eating cherries.

    I've only made cherry cordial twice before. Once with sweet cherries, which turned out thin and insipid, and once with tiny wild black cherries, which had so much pectin in them that the cordial turned into a sort of alcoholic jelly in the bottles!

    Let's hope this time we find a happy medium!

    After I picked a big bowlful of cherries, I pitted them all by poking them with a kitchen skewer. Then I filled two clean mason jars about 1/2 full (approximately 2 cups of cherries in each one), and mashed the cherries thoroughly to release as much of the juice and flavor as possible. Then I dropped a 3" piece of stick cinnamon into each jar (breaking each one into several pieces for better flavor distribution), and filled the jars to the brim with brandy.

    For cordial making, we use Christian Brothers Frost White Brandy, because it is colorless. For best presentation, we like our cordials to get all of their color from the natural ingredients inside, not from the alcohol base.

    Once the jars were filled and sealed, I shook each one briefly to disperse the brandy all through the fruit. The brandy is what preserves the fruit from spoiling as it steeps, so you want to make sure it's well mixed.

    Now I just put the jars away for a few weeks in a cool, dark place. I'll shake them once a day for a few days to keep the brandy well-dispersed.

    Then, near the end of June, I'll do the next step. So stay tuned for Part 2!

    Tuesday, October 9, 2007

    Hermaphrodite Stew

    Guess what we're having for supper?

    Yes, that's right: Hermaphrodite Stew.

    You see, last fall we bought a group of ewe lambs from a breeder. Over the winter they grew and matured as lambs will do. Except, as time went on, it became obvious that one of them, a black mouflon ewe named Sonnet, was maturing a little differently from the others.

    Our first hint that something wasn't right was the confusion that happened at breeding time. Sonnet seemed to go into heat like the other ewes. She allowed the ram to breed her one day, just like normal. But then, for the rest of breeding season, SHE acted like a ram, doing all the typical courtship behavior: sniffing, pawing, and following the other ewes around. She even started fighting to defend "her" ewes from the ram!

    She never did have a lamb from that one breeding. By late spring, she was bigger than the other ewes her age. Her horns were two or three times the size of her sisters' horns. She developed a prominent hump on the bridge of her nose. And her genitals, while basically female in outline, were shaped a little funny.

    When shearing time came and all her thick wool was removed, we were able to get our first proof that Sonnet really was not "all girl." Her udder was completely undeveloped, to the point of being practically nonexistent. And beneath the skin near where the udder should have been, there was the small but obvious shape of a partially developed, undescended testicle!

    We're not sure exactly how it happened, but Sonnet was a triplet. My guess is that maybe she was supposed to be a quad, but she ended up absorbing the fetus of her brother in utero, and ended up with a few of his "parts" mixed in with hers.

    Since you already read the title to this post, there's no need to draw out the suspense about her ultimate fate. This is a breeding farm, and Sonnet was never going to be a breeding animal. So around midsummer, she went to the butcher. He was amazed---in all his years, he said he'd never seen a hermaphrodite before.

    In the end, Sonnet made her contribution to the farm. Her meat went into the freezer, her hide is salted and waiting to be tanned into a pelt, and her horns were sold to someone for a craft project.

    Oh... and you may be interested to know that Sonnet's breeder gave me a replacement lamb this year, to make up for the problem. Guess who that was? That's right: the famous Trouble the Runaway Lamb, whom I've written so many posts about.

    What a bizarre chain of events this has been!


    So, just in case you ever want to make a really tasty lamb stew, here's my recipe, which I've named in honor of Sonnet.

    It's extremely flavorful, rich, and slightly sweet. It makes a very large batch---I like to make a lot at once, and freeze some for later---so you may want to cut the amounts in half.

    Hermaphrodite Stew

    • 6-8 lbs. of Icelandic lamb shanks and/or necks (bones included)
    • Water enough to cover the meat (about 4 quarts)
    Put the meat in a large pot with enough water to cover the pieces. Bring to a boil, then lower the heat and simmer, covered, until the meat is tender and falling from the bones (about 2 hours).

    Remove from heat. When cool enough to handle, scoop out all the lamb chunks and remove the meat from the bones. Break up any large chunks of meat into bite-sized pieces. Return the meat to the broth. Give the bones to your dogs!


    Cut up into bite-sized pieces:
    • 3 large potatoes
    • 2 large onions
    • 6 large stalks of celery
    • 1 lb. carrots
    Add the vegetables to the pot of meat and broth. Return to a simmer.

    As the vegetables are cooking, add:


    • 6-8 bay leaves
    • 2 x 6-oz cans tomato paste
    • 1/2 cup red wine vinegar
    • 1/2 cup sherry
    • 1/2 cup soy sauce
    • 1 TB crushed dried rosemary
    • 1 TB ground coriander
    • 1 tsp ground black pepper
    • 1.5 TB minced fresh garlic
    • 1/4 cup brown sugar
    Cook until vegetables are tender (about 1 hour).

    Enjoy!